Wednesday, October 16, 2019

A reader responds

Hi Pete,

I have some nits with your blog post, in particular two points:

1) ALAN: I found it ironic that you wrote this while you are currently learning something new (neural networks...) while I agree you want to balance learning new things with getting stuff done, I think it’s important to always learn new things.

2) good at one thing vs. multiple. This one struck a chord with me, I think I’m not that good at any one thing: There are people in graphics let alone math with way better math chops than me, same for physics / ME / etc. There are also people with better low level (optimizing code) and high level (software architecture) programming skills than me. I think it is precisely that I am pretty good at multiple different things that has made me successful - most people that are really good at math are terrible programmers, and great coders are often bad at math. I actually think a mixture of skills is super valuable! In games technical artist, or programmers with an eye for art, are super valuable for this same reason.

I think a lot of the advice seemed good and resonated with me, but those two points did not.

Saturday, September 28, 2019

How to succeed as a poor programmer

In a previous post I outlined why programmers should strive to be good at one thing rather than everything.

In this post I discuss how to be an asset to an organization when you are not a good programmer.  First, for the record:

I am a poor programmer.   Ask anyone who has worked on group projects with me.

But the key compensation is I am aware I am a poor programmer.   I do not try to do anything fancy.   I follow some heuristics that keep me productive IMO.   I think these heuristics are in fact good for all programmers, but are essential for those of us in the bottom quartile.

  1. KISS.   Always ask first something the extreme programming movement advocates:  what is the simplest thing that could possibly work?  Try that and if it doesn't work, try the second simplest thing.
  2. YAGNI.   When it comes to features and generality, "You Aint Gonna Need It".
  3. ALAN. Avoid Learning Anything New.   Various languages and environments and tools come and go, and each of them requires learning a new set of facts, practices, and a mentality.   And they will probably go away.   Only learn something new when forced.   In 1990 I learned C++.   In 2015 I learned Python.  Good enough.
  4. Make arrays your goto data structure.   Always ask "how would a FORTRAN programmer do this?".   During the course of your lifetime, you should occasionally use trees, but view them like binge drinking... regular use will damage your liver.
  5. Never pretend you understand something when you don't, and never bluff.  Google first, then ask people for what to read, and finally ask for a tutorial from a colleague.   We are all ignorant about almost all things. 
  6. Be aware that most coding advice is bad.   Think about whether there is empirical evidence that a given piece of advice is true.
  7. Avoid linking to other software unless forced.  It empirically rarely goes well.
  8. Try to develop a comfort zone in some area.   Mine is geometric C++ code that calls random numbers.   Don't try to be an expert in everything or even most things.
Finally, let the computer do the work; Dave Kirk talks about the elegance of brute force (I don't know if it original with him).  This is a cousin of KISS.   Hardware is fast.  Software is hard.   Bask in the miracle of creation in software; you make something with behavior out of bits.   If you are bad at programming, you are still programming, something that very few people can do.

Tuesday, June 4, 2019

How bright is that screen? And how good a light is it?

I have always wanted a "fishtank VR" fake window that is bright enough to light a room.   Everytime a new brighter screen comes out I want to know whether it is bright enough.

Apple just announced a boss 6K screen.   But what caught my eye was this:

"...and can maintain 1,000 nits of full-screen brightness indefinitely."

That is very bright compared to most screens (though not all-- the SIM2 sells one that is about 5X that but it's a small market device at present).   How bright is 1000 nits?

First, let's get some comparisons.   "Nits" is a measure of luminance, which is an objective approximation to "how bright is that".   A good measure if I want a VR window is sky brightness.  Wikipedia has an excellent page on this I grab this table from:


Note that the Apple monitor is almost at the cloudy day luminance (and the SIM2 is at the clear sky luminance).   So we are very close!

Now as a light source one could read by, the *size* of the screen matters.   Both the Apple monitor and the SIM2 monitor are about half a meter in area.   How many *lumens* is the screen?   This is how we measure light bulbs.

This 100 Watt EQ bulb is 1600 lumens.   So that is a decent target for a screen to read by.   So how do we convert a screen of a certain area with a luminance to lumens?   As graphics people let's remember that for a diffuse emitter we know wsomething about luminous exitance (luminous flux):

luminance = luminous exitance  divided by (Pi times Area)

So 1000 = E / (0.5*PI) = E/6 (about).

E is lumens per square meter.   So we want lumens = E*A = 0.5*E = 1000.   So lumens = 2000.   That is about a 100 watt bulb.   So I think you could read by this Apple screen if it's as close as you would keep a reading lamp.   If one of you buys one, let me know if I am right or if I am off by 10X (or whatever) which would not surprise me!


Tuesday, March 12, 2019

Making your BVH faster


I am no expert in making BVHs fast so just use this blog post as a starting point.   But there are some things you can try if you want to speed things up.   All of them involve tradeoffs so test them rather than assume they are faster!  

1. Store the inverse ray direction with the ray.   The most popular ray-bounding box hit test assumes this (used in both the intel and nvidia ray tracers as far as I know):


Note that if ray direction were passed in you would have 6 divides rather than 6 adds.

2.  Do an early out in your ray traversal.   This is a trick used in many BVHs but not the one I have in the ray tracing minibook series.   Martin Lambers suggested this version to me which is not only faster, it is cleaner code.


3. Build using the surface area heuristic (SAH).   This is a greedy algorithm that minimizes the sum of the areas of the bounding boxes in the level being built.    I based mine on the pseudocode in this old paper I did with Ingo Wald and Solomon Boulos.    I used simple arrays for the sets and the quicksort from wikipedia for the sort.


Sunday, February 17, 2019

Lazy person's tone mapping

In a physically-based renderer, your RGB values are not confined to [0,1] and your need to deal with that somehow.

The simplest thing is to clamp them to zero to one.   In my own C++ code:
inline vec3 vec3::clamp() {
    if (e[0] < real(0)) e[0] = 0;
    if (e[1] < real(0)) e[1] = 0;
    if (e[2] < real(0)) e[2] = 0;
    if (e[0] > real(1)) e[0] = 1;
    if (e[1] > real(1)) e[1] = 1;
    if (e[2] > real(1)) e[2] = 1;
    return *this;
 }


A more pleasing result can probably be had by applying a "tone mapping" algorithm.   The easiest is probably Eric Reinhard's "L/(1+L)" operator from the Equation 3 of this paper

Here is my implementation of it.   You still need to clamp because of highly saturated colors, and purists wont like my luminance formula (1/3.1/3.1/3) but never listen to purists :)

void reinhard_tone_map(real mid_grey = real(0.2)) {
// using even values for luminance.   This is more robust than standard NTSC luminance
// Reinhard tone mapper is to first map a value that we want to be "mid gray" to 0.2// And then we apply the L = 1/(1+L) formula that controls the values above 1.0 in a graceful manner.
    real scale = (real(0.2)/mid_grey);
    for (int i = 0; i < nx*ny; i++) {
        vec3 temp = scale*vdata[i];
        real L = real(1.0/3.0)*(temp[0] + temp[1] + temp[2]);
        real multiplier = ONE/(ONE + L);
        temp *= multiplier;
           temp.clamp();
           vdata[i] = temp;
        }

}

This will slightly darken the dark pixels and greatly darken the bright pixels.   Equation 4 in the Reinhard paper will give you more control.   The cool kids  have been using "filmic tone mapping" and it is the best tone mapping I have seen, but I have not implemented it (see title to this blog post)


Thursday, February 14, 2019

Picking points on the hemisphere with a cosine density


NOTE: this post has three basic problems.  It assumes property 1 and 2 are true, and there is a missing piece at the end that keeps us from showing anything :)

This post results from a bunch of conversations with Dave Hart and the twitter hive brain.  There are several ways to generate a random Lambertian direction from a point with surface normal N.   One way is inspired by a cool paper by Sbert and Sandez where he simultaniously generated many form factors by repeatedly selecting a uniformly random 3D line in the scene.   This can be used to generate a direction with a cosine density, an idea first described, as far as I know, by Edd Biddulph.

I am going to describe it here using three properties, each of which I don't have a concise proof for.   Any help appreciated!   (I have algebraic proofs-- they just aren't enlightening--- hoping for a clever geometric observation).


Property 1: 
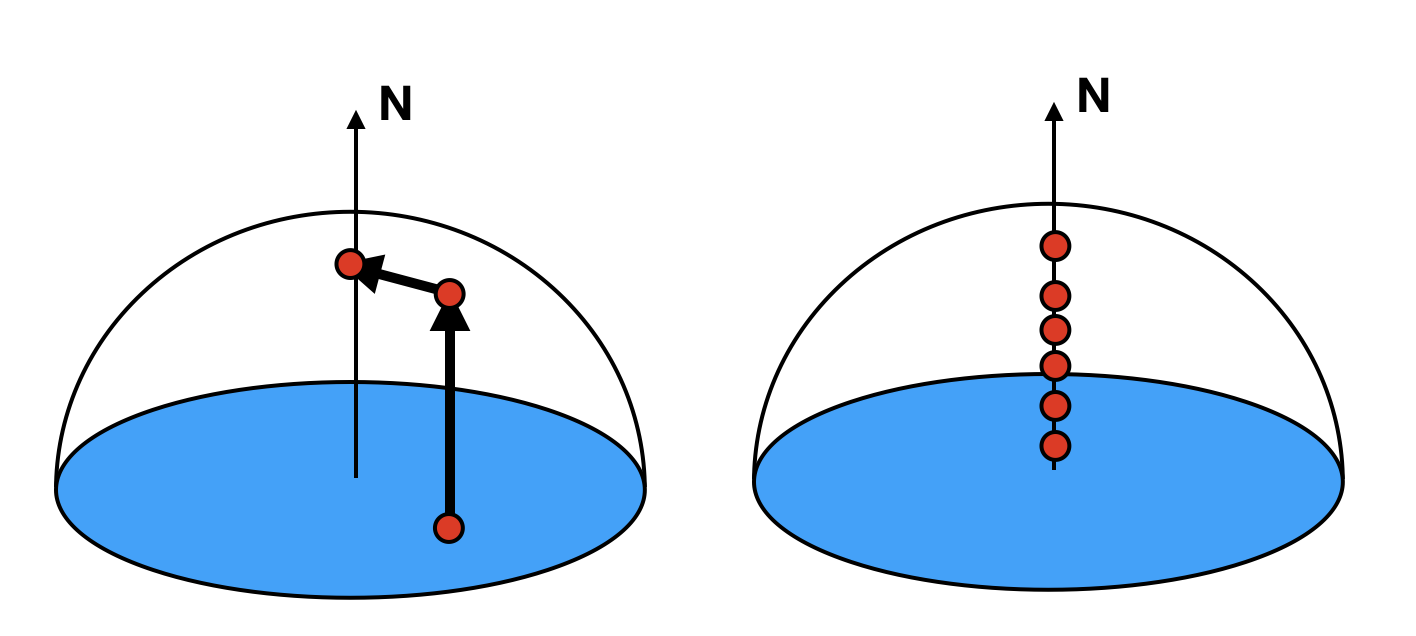
Nusselt Analog: uniform random points on an equatorial disk projected onto the sphere have a cosine density.   So in the figure, the red points, if all of them projected, have a cosine density.

 Property 2: (THIS PROPERTY IS NOT TRUE-- SEE COMMENTS) The red points in the diagram above when projected onto the normal, will have a uniform density along it:
 Property 3: For random points on a 3D sphere, as shown (badly) below, they when projected onto the central axis will be uniform on the central axis.


Now if we accept Property 3, we can first generate a random point on a sphere by first choosing a random phi uniformly theta = 2*PI*urandom(), and then choose a random height from negative 1 to 1, height = -1 + 2*urandom()

In XYZ coordinates we can convert this to:
z = -1 + 2*urandom()
phi = 2*PI*urandom()
x = cos(phi)*sqrt(1-z*z)
y = sin(phi)*sqrt(1-z^2)

Similarly from property 2 we can given a random point (x,y) on a unit disk in the XY plane, we can generate a direction with cosine density when N = the z axis:

(x,y) = random on disk
z = sqrt(1-x*x-y*y)

To generate a cosine direction relative to a surface normal N, people usually construct a local basis, ANY local basis, with tangent and bitangent vectors B and T and change coordinate frames:

get_tangents(B,T,N)
(x,y) = random on disk
z = sqrt(1-x*x-y*y)
direction = x*B + y*T + z*N

There is finally a compact and robust way to write get_tangents.   So use that, and your code is fast and good.   

But can we do this show that using a uniform random sphere lets us do this without tangents?

So  we do this:
P = (x,y,z) = random_on_unit_sphere
D = unit_vector(N + P)

So D is the green dot while (N+P) is the red dot:


 So  is there a clever observation that the green dot is either 1) uniform along N, or 2, uniform on the disk when projected?


Tuesday, February 12, 2019

Adding point and directional lights to a physically based renderer


Suppose you have a physically based renderer with area lights.   Along comes a model with point and directional lights.   Perhaps the easiest way to deal with them is convert them to a very small spherical light source.   But how do you do that in a way that gets the color right?   IF you have things set up so they tend to be tone mapped (a potential big no in physically-based renderer), meaning that a color of (1,1,1) will be white, and (0.2,0.2,0.2) a mid-grey (gamma-- so not 0.5-- the eye does not see intensities linearly), then it is not so bad.

Assume you have a spherical light with radius R at position C and emitted radiance (E,E,E).    When it is straight up from a white surface (so the sun at noon at the equator), you get this equation (about) for the color at a point P

reflected_color = (E,E,E)*solid_angle_of_light / PI

The solid angle of the light is its projected area on the unit sphere around the illuminated point, or approximately:

solid_angle_of_light = PI*R^2 /distance_squared(P,C)

So

 reflected_color = (E,E,E)*(R / distance(P,C))^2

If we want the white surface to be exactly white then

E = (distance(P,C) / R)^2

So pick a small R (say 0.001), pick a point in your scene (say the one the viewer is looking at, or 0,0,0),  and and set E as in the green equation


Suppose the RGB "color" given for the point source is  (cr, cg, cb).    Then just multiply the (E,E,E) by those components.     

Directional lights are a similar hack, but a little less prone to problems of whther falloff was intended.   A directional light is usually the sun, and it's very far away.    Assume the direction is D = (dx,dy,dz)

Pick a big distance (one that wont break your renderer) and place the center in that direction:

C = big_constant*D

Pick a small radius.   Again one that wont break your renderer.   Then use the green equation above.

Now sometimes the directional sources are just the Sun and will look better if you give them the same angular size for the Sun.   If your model is in meters, then just use distance = 150,000,000,000m.   OK now your program will break due to floating point.   Instead pick a somewhat big distance and use the right ratio of Sun radius to distance:

R = distance *(695,700km / 149,597,870km)

And your shadows will look ok