Tuesday, April 14, 2015

Sampling a disk revisited

In almost all variants of Monte Carlo renderers there are various point samples that are averaged.  The most common example is a square pixel with box filter (i.e., the average within the pixel is taken).  Underlying whatever screen coordinates you use, there is some
"get ith point in square" or "get N points in square" function.   The square is usually [0,1)^2.  These always seem to add more ugliness to programs than I would expect, but we'll save that for another time.   Additionally, it's really a multidimensional sampling (i.e., antialised motion-blur is 3D) a topic we will also defer.

There are five basic strategies for getting 2D samples on the unit square:
  1. Regular (lattice, sometimes rotated.)
  2. Random
  3. Jittering (stratified sampling)
  4. QMC
  5. Optimized
Of these I suspect optimized (introduced by Don Mitchell back in the day) is the best, but that is still a topic of research.  I'm going for easy so will do jittered.

Jittered is usually done for perfect square number of samples because it is a SxS grid that "jittered" or perturbed.  Pseudocode for Jittered for S^2 samples (e.g, for S = 4, 16 samples) is:

Vec2 get_sample(int s, int sqrt_num_samples)
        float i = s % sqrt_num_samples
        float j = s /  sqrt_num_samples
        return Vec2((i+drand48())/ sqrt_num_samples, (i+drand48())/ sqrt_num_samples)

If we are going to sample a disk (like a lens) people typically sample a unit disk centered at (0,0) with radius 1.    If we transform a sample (u,v) on [0,1)^2 to a disk we can't do this:

Vec2 transform_to_disk(Vec2 on_square)
        theta = 2*PI*on_square.x
        r =   on_square.y
        return (r*cos(theta), r*sin(theta))

Because this will clump up samples near r=0.  Instead we need  r =   sqrt(on_square.y) which compensates for the distortion.

However, there is a "concentric" mapping on the square that some say is better and Dave Cline sent me (see previous blog post) a nicely small code for that so I finally tried it.

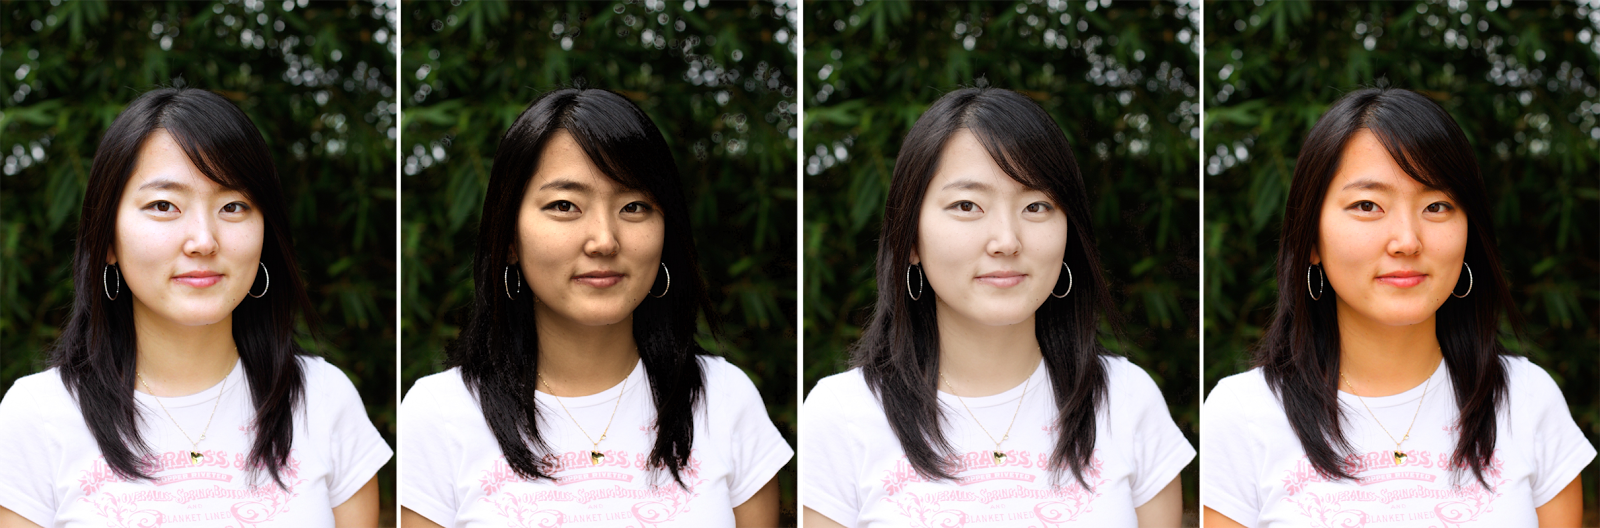
Here is an image with random sampling and 25 samples per pixel.
Random sampling 25 samples per pixel
I also tried 45 and 100 samples per pixel with the two different mappings to the disk discussed above.  I zoomed in (using cut and paste so not a very precise test-- in my experience if a precise test is needed it is not a big effect).  This are zoomed in with 5X and pixel duplication


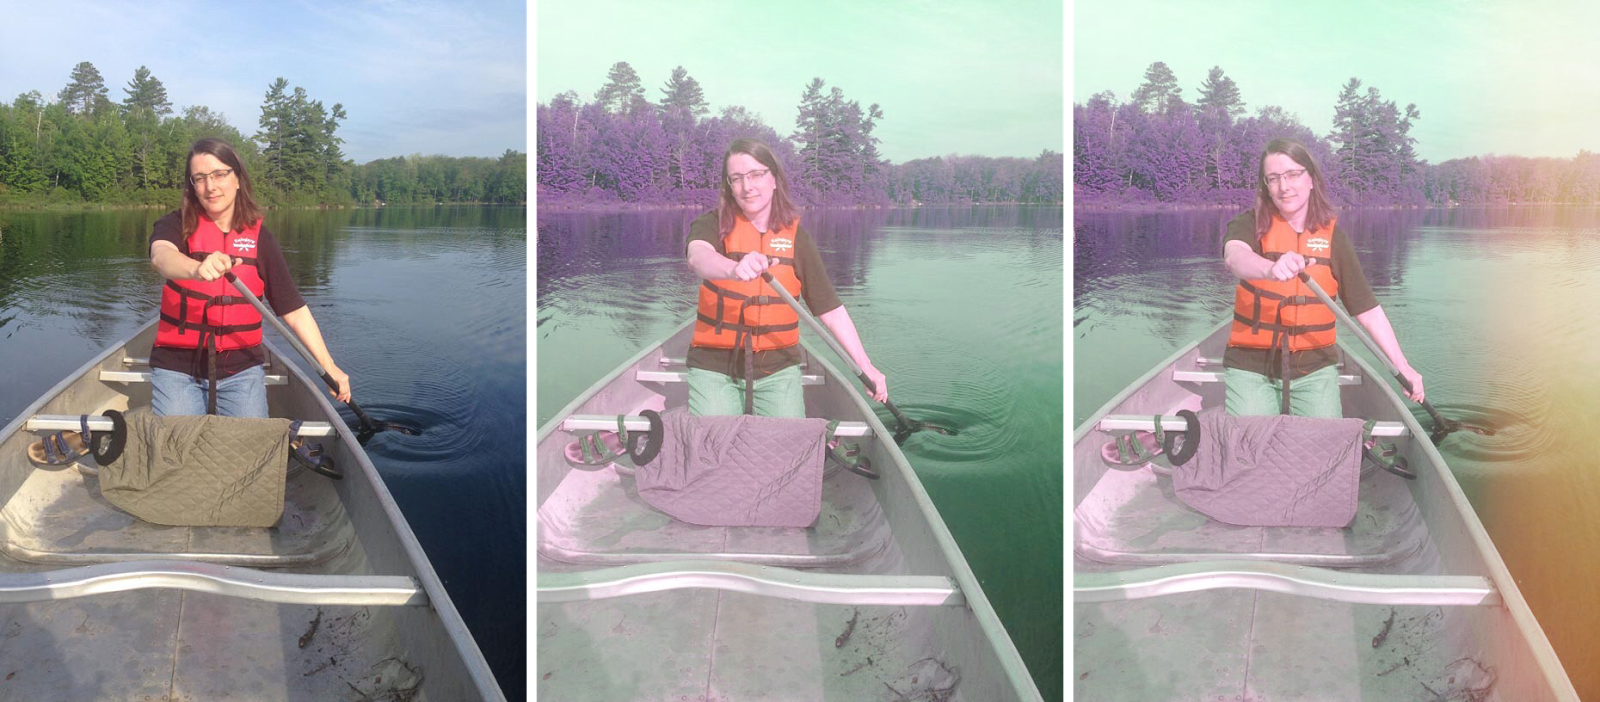
25 samples per pixel, random, jittered, and jittered with concentric map.

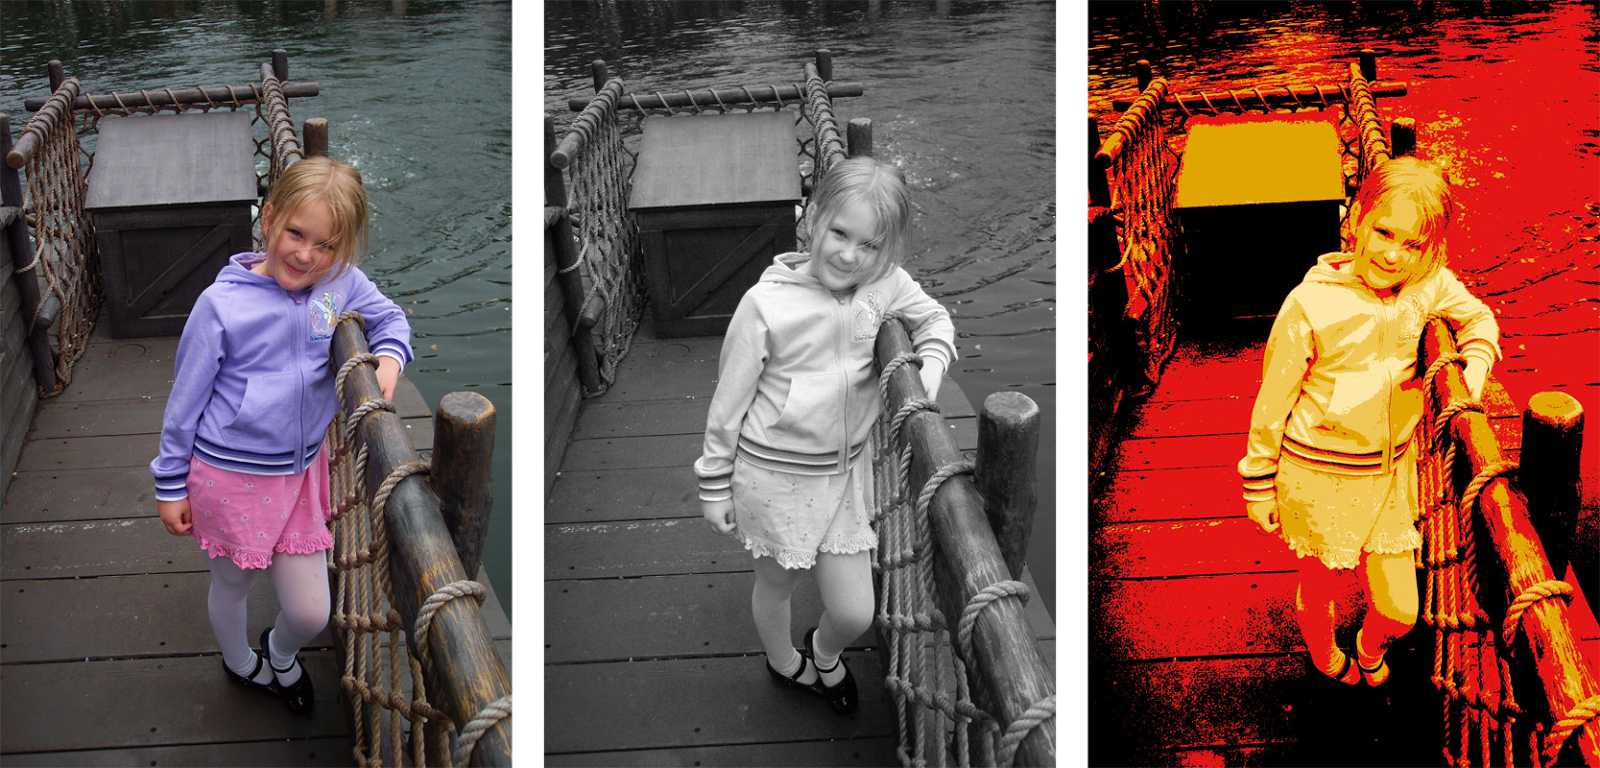
49 samples per pixel, random, jittered, and jittered with concentric map.

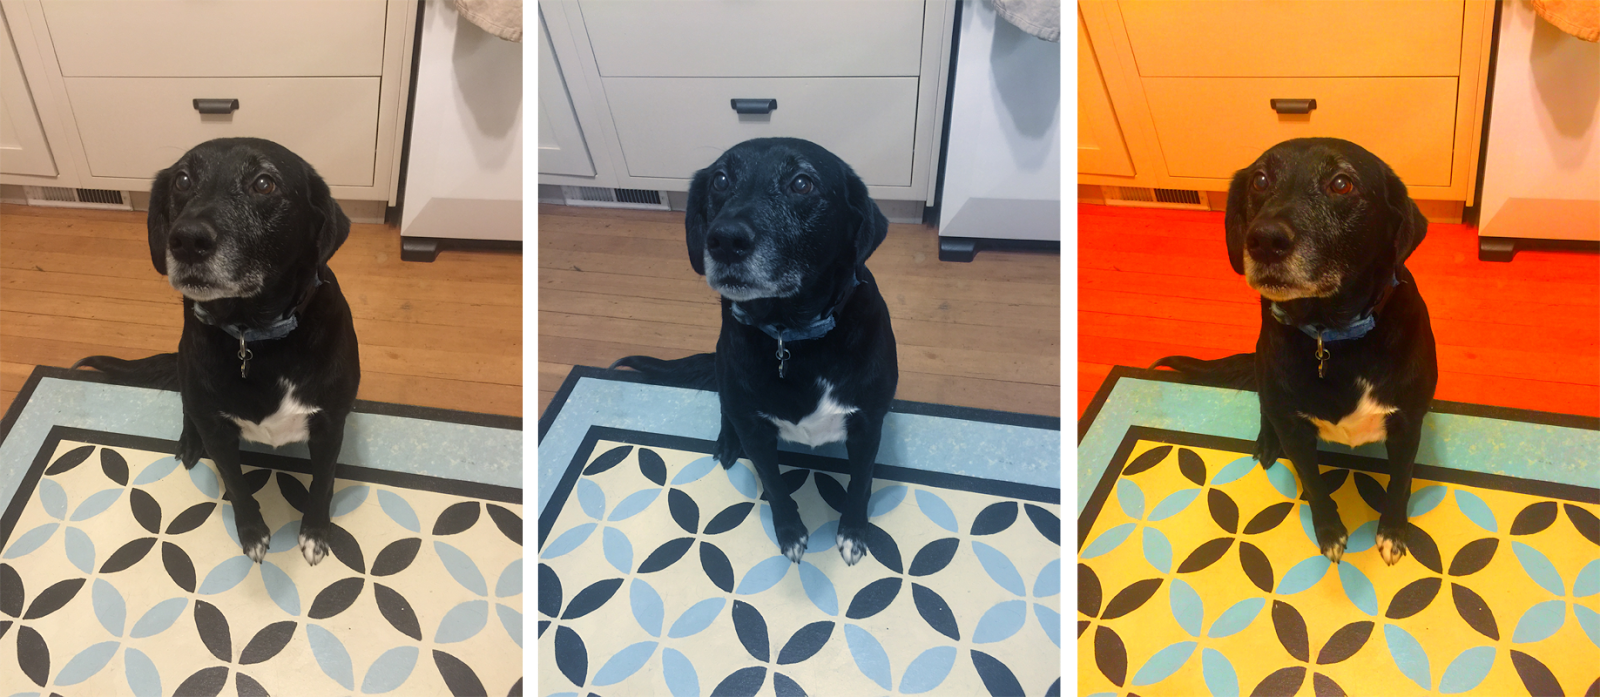
100 samples per pixel, random, jittered, and jittered with concentric map.

 All in all for this case I do think the concentric map does make a SLIGHT improvement.  But the big leap is clearly jittering at all.   Still, Dave Cline's code is so simple I think it is worth it.

Sunday, April 12, 2015

Rocket Golfing: Morgan McGuire's new iOS video game

I was (and still am) addicted to Angry Birds, but Rocket Golfing has displaced it for me.   This is Morgan McGuire's new iOS game that is just out, but I have been play testing it the last month.  Here's his promo video:


I love it.   It's not only a really good game, it has an unbounded number of procedural levels.   I hope Morgan will publish how he did that.    I'm sure many of you are familiar with Morgan's work on Console games and realistic rendering research, which is the context I know him from when we worked together at NVIDIA Research.   So I was surprised he did a 2D kid/adult game/education games that is so fun.

A personal thing I really like about it is it takes me back to my first "wow" moment with video games when I saw the coin-operated Space Wars over three decades ago.  It was simple graphics but it had terrific gravitational physics and I really liked the game play.  Here's a screenshot from Wikipedia:
Screen Shot from Space Wars (Wikipedia)

Only later did I find out that Space Wars was the grandchild of the game SpaceWar! which is so old that it was released the year before I was born!   To give you an idea of how primeval programming was then, check out this quote from the wikipedia article: "After Alan Kotok obtained some sine and cosine routines from DEC, Russell began coding, and, by February 1962, had produced his first version."  Apparently SpaceWar! was played a lot at the University of Utah and that is part of the Atari Origin Story.   I do like Morgan's game better, but I especially love the connections to OLD school computer graphics.   In addition, its space trivia gets back at the excitement of the space race when I was growing up (and thankfully seems to getting so new breath, or so I hope).  I also like that I don't need to pump quarters into it-- it's a pay once (12 quarters) and no in-app purchases or adds or any of that stuff.

Tuesday, April 7, 2015

Pixar's old tileable textures

Pixar's terrific 1993 tileable textures now online.   850MB.


Friday, April 3, 2015

Cameras in a distribution ray tracer

You need two things in a distribution ray tracer camera.  First is just to be able to have the light be gathered from a lens (disk) rather than a point.  Second in to move and rotate the lens.

A very generic way to generate viewing rays for pixels (i,j) for a square image with W = H in version 0.1 of the ray tracer looking up the -z axis is:

       vec3 ray_direction(-1.0 + 2.0*i/(W-1.0), -1.0 + 2.0*j/(H-1.0), -1.0);

The ray origin is just (0,0,0).   That can produce an image like this (see last blog posting). 
Distribution ray tracer with 100 non-stratified samples and a simple pinhole camera

Now we just need to make the ray origin a random point on the radius R XY disk centered at the origin:

   vec3 random_xy_disk() {
       vec3 p;
       do {
           p = vec3(2*drand48()-1,2*drand48()-1,0);
       } while (dot(p,p) > 1);
       return p;
   }

   vec3 origin = R*random_xy_disk()
   ray_direction *= focus_distance; // distance to where things are in focus
   ray_direction -= origin;

Yes, there are more efficient and compact ways to do that.  We're into getting the program done ASAP here :).   Now all the rays for a given pixel will converge at z distance focus.

Now we need to move the camera lens to position "eye" (yeah bad legacy naming).   We want to focus on a point at position "lookat" (there are many other viewing systems like specify the gaze direction, and it's a matter of taste-- just use one!).   We need a "view up vector" which would be any vector from the center of the skull through the center parted hair of a person.  This will allow us to make an orthonormal basis uvw:

    vec3 w = eye - lookat;  // z axis goes behind us
    vec3 u = cross(w, vup);
    vec3 vv = cross(w, u);
    focus = w.length();
    u.MakeUnitVector();
    v.MakeUnitVector();
    w.MakeUnitVector();


Add a horizontal field-of-view so we can go for non-square images and we get:
        
        float     float multiplier = tan(hfov/2);
        ray_origin = 0.2*random_xy_disk();
        vec3 ray_direction(-1.0 + 2.0*float(i)/(W-1.0), -1.0*H/W + 2.0*float(j)/(W-1.0), -1.0);
        ray_direction *= vec3(multiplier, multiplier, 1.0);
        ray_direction = focus*ray_direction - ray_origin;
        ray_origin = ray_origin.x()*u + ray_origin.y()*v + ray_origin.z()*w;
        ray_direction = ray_direction.x()*u + ray_direction.y()*v + ray_direction.z()*w;


And that gives:
Depth of field, viewing,  100 unstratified samples.


Friday, March 27, 2015

Easy distribution ray tracer

I am having my graphics class at Westminster College (not a new job-- I am teaching a course for them as an adjunct-- so go buy my apps!) turn their Whitted-style ray tracer into a distribution ray tracer.   I think how we are doing it is the easiest way possible, but I still managed to butcher the topic in lecture so I am posting this mainly for my students.   But if anybody tries it or sees something easier please weigh in.   Note these are not "perfect" distributions, but neither is uniform or phong really :)

Suppose we have a basic ray tracer where we send a shadow and reflection ray.
The basic code (where rgb colors geometric vectors are vec3) will look like:
vec3 rayColor(ray r, int depth) {
    vec3 color(0)
    if (depth > maxDepth) return color
    if (hitsScene(r)) {  // somehow this passes back state like hitpoint p
         if (Rs > 0) { // Rs is rgb specular reflectance
                ray s(p, reflect(r, N))
                color += rayColor(s, depth+1)
         }
         if (Rd > 0) { //Rd is rgb diffuse reflectance
                 ray shadow(p, L)   // L is the direction to the one light
                 if (not hitsScene(shadow)) {
                       color += Rd*lightColor*max(0, dot(N,L) )
                 }
          }
      }
      else 
             color = background(r)
      return color
}
               
           
The three spheres we add to get fuzzy effect.
Now let's assume we want to fuzz things up to get soft shadows and glossy reflections, and that we want diffuse rays for bounce lighting (even one level of depth would help).   We just need to pick random points in three sphere, one for each effect.   Let's assume we have a function rs() that returns a random point in a unit sphere centered at the origin (see last blog post).   All we need to do is randomly perturb each shadow and specular reflection ray, and we can generate another diffuse ray that will get bounce light.  This is:

vec3 rayColor(ray r, int depth) {
    vec3 color(0)
    if (depth > maxDepth) return color
    if (hitsScene(r)) {  // somehow this passes back state like hitpoint p
         if (Rs > 0) { // Rs is rgb specular reflectance
                // radius_specular is a material parameter where 0 = perfect
                ray s(p, reflect(r, N)+ radius_specular*rs())
                color += rayColor(s, depth+1)
         }
         if (Rd > 0) { //Rd is rgb diffuse reflectance 
                ray shadow(p, L + radius_shadow*rs())   // L is the direction to the one light
                if (not hitsScene(shadow)) {
                       color += Rd*lightColor*max(0, dot(N,L) )
                }
                ray diffuse(p, N + rs()) // assumes N is unit length
                color += Rd*rayColor(diffuse, depth+1)
          }
      }
      else 
             color = background(r)
      return color
}

Easy random point in sphere

Often you need a uniform random point in a sphere.   There are good methods for doing that that have deterministic runtime and good stratification and all that, but usually you just want something easy that works, and rejection sampling is usually the way to go.    Usually you take a larger domain than the target one and repeatedly "throw darts" until one hits the target.
First let's do this in 2D with a circle at center c = (xc, yc) and radius R.  Now let's assume we have a random number generator r() that returns floats in [0,1) (like drand48() in most C environments or Math.random() in Java).


do {  // pick random point insquare until it is inside the circle
      x = xc - R + 2*R*r()
      y = yc - R + 2*R*r()
} while (sqr(x - xc) + sqr(y - yc) > sqr(R))

For 3D, the extension is just the dimension add:


do {  // pick random point in cube until it is inside the sphere
      x = xc - R + 2*R*r()
      y = yc - R + 2*R*r()
      z = zc - R + 2*R*r()
} while (sqr(x - xc) + sqr(y - yc) + sqr(z- zc) > sqr(R))


Friday, March 20, 2015

Twenty iOS Photo App Extensions

Apple recently added photo app extensions to iOS, and we have added this feature to all our -Pic apps.   The thing that excites me the most about this is you can easily use a series of apps grabbing their best feature for a fluid editing pipeline.  To experiment with these emerging pipelines I have grabbed all the photo apps supporting extensions I can find.  Some of them don't work for me and I don't list those here (and stability of app extensions are improving so I will add them as they or Apple fix the issues).  I list them here, most of them with my test on a feature from each of them along with one of our apps. 

Afterlight is a popular general purpose app.  One of its most unique features is a big set of light leak effects.  Here it is being used with PicJr (a kids app with some over-the-top photo transforms) to make a very damaged old photo.
Left to right: original image, faded and distorted by PicJr, light leak using Afterlight.

Camera Plus is a powerful general purpose apps and I especially like their frames and lab features.
Using a frame, noise, crop/blur from Camera Plus

ChowPic, by my company Purity, LLC, improves food photos.

Before and after ChowPic

 Effects Studio has several neat specialized features and I am especially fond of its sharpen feature in conjunction with our StencilPic app.
Original image, sharpened with Effects Studio, and stenciled with StencilPic

Etchings is an NPR app that does engraving like effects mostly in bitone but some with color.  I am very impressed with their stoke generation!  I've enjoyed using it in series with our own StencilPic.
Original image,  after processing by Etchings app, and further processed by StencilPic


Filters+ has some unusual manipulations I don't see in any other apps such as "make a greyscale image from the max RGB component".  I have found these useful to get some good stencils from images that are otherwise problematic such as the one below where popping out the max component helps separate out the more saturated foreground.  Another cool thing about Filters+ is that it only runs as an app extension-- the app just opens a user guide.

Original image processed to get max RGB component in Filters+ and then sent to StencilPic

Flare Effects has many vintage and real camera filters.   I like to use the old CCTV to get scanlines and then stencil them for some cool aliasing color effects.
Original image, Flare Effects Old CCTV filter, and then StencilPic


Fotograph has a number of thumbnail and slider-based adjustments.  My favorite is their color temperature and saturation sliders which are very stable into even extreme territory.

Original photo, cool temperature, and large saturation in Fotograph app

Fragment has many kaleidascope inspired effects.  Of course I like to stencil them.
Original image, run through Fragment, and then run through StencilPic

LandscapePic is our own app that like all of those here also runs as an app extension.  It can ignore preserving skintones so it can let you turn everything to 11 (but you don't have to).
Original image and two selections from LandscpePic
MePic is designed to change skintone and contrast in selfies.
Original and three variations in MePic.  Original photo courtesy Parker Knight at flickr.

Paper Camera is an NPR app with a clever interface of three sliders and a set of preset positions for them.  It's of course good for a stencil pre-process too.
Paper Camera stylization followed by StencilPic.  Original courtesy Parker Knight at flickr


 Photo Wizard has a variety of filters and effects and also has stickers and drawing functionality.
Photo Wizard is used to add a sticker and then SepiaPic is used.

ProCam is a full-featured app with some very nice UI.  The tilt-shift has an especially nice pinch interface.
Original image, color transformed with LandscapePic , and tilt-shifted with ProCam.
Quick applies text on images with a nice simple interface.
SimplePic is used to darken background and Quick is used to add text

Rookie has many filters including some that add spatial effects such as the rain below.
Rookie is used to add rain effect and then StencilPic is applied

SepiaPic selects from four basic palettes and can combine the original image and the sepiatone.
SepiaPic

SimplePic is our general purpose simple photo editor.  You have three screens to adjust contrast, color temperature, and saturation.
Original and processed with SimplePic

TattooPic is tailored to making tattoos look better.  This is the sort of special purpose app that runs as an extension we expect to get more common.
Before and after TattooPic
That is all the photo apps with extensions (that don't crash) that I could find.  Let me know if I am missing any!